 |
 |
|
 |
|
 |
|  |
|  |
|
 |
|
 |
|  |
|  |
|
 |
Hi
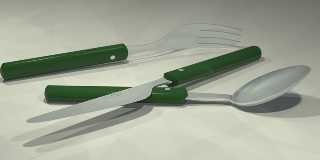
Inspired by the latest kitchen stuff I got back my kitchen scene and started
to make some things to put there. These might work in the final scene
because they'll be far enough from the camera too loose the ugly details..
especially the spoon.
Doing this close up I started to wounder how does one scratch objects? In
Pov-ray I mean.. Now I have a normal { bozo slope_map } scaled longer in one
dimension, but then all scrathes are pointing in the same direction. Any
ideas on a more random scratching?
Ari-Matti
Post a reply to this message
Attachments:
Download 'hackman.jpg' (32 KB)
Preview of image 'hackman.jpg'

|
 |
|  |
|  |
|
 |
|
 |
|  |
|  |
|
 |
Ari-Matti Leppanen wrote:
>
> Doing this close up I started to wounder how does one scratch objects?
It's not that hard to make or combine textures and bump maps in
image editor. And they render faster than procedural textures.
Some time ago I made a scratched metal bump map. It took 15 minutes
in Photoshop to make. Try it, it may work :)
http://www.pp.htv.fi/kkivisal/metal_bm.jpg
_____________
Kari Kivisalo
Post a reply to this message
|
 |
|  |
|  |
|
 |
|
 |
|  |
|  |
|
 |
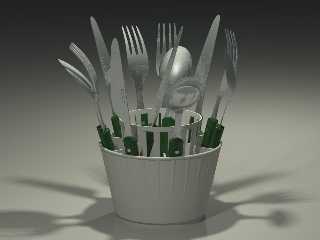
..and a nice jar for drying them.
Ari-Matti
Post a reply to this message
Attachments:
Download 'tableware.jpg' (48 KB)
Preview of image 'tableware.jpg'

|
 |
|  |
|  |
|
 |
|
 |
|  |
|  |
|
 |
"Kari Kivisalo" <ray### [at] engineer com> wrote in message
news:3C3C332C.19CC3956@engineer.com...
> It's not that hard to make or combine textures and bump maps in
> image editor. And they render faster than procedural textures.
I just have a weird urge to do every thing with procedural textures..
> Some time ago I made a scratched metal bump map. It took 15 minutes
> in Photoshop to make. Try it, it may work :)
> http://www.pp.htv.fi/kkivisal/metal_bm.jpg
Thanks, I'll give it a go.
Ari-Matti com> wrote in message
news:3C3C332C.19CC3956@engineer.com...
> It's not that hard to make or combine textures and bump maps in
> image editor. And they render faster than procedural textures.
I just have a weird urge to do every thing with procedural textures..
> Some time ago I made a scratched metal bump map. It took 15 minutes
> in Photoshop to make. Try it, it may work :)
> http://www.pp.htv.fi/kkivisal/metal_bm.jpg
Thanks, I'll give it a go.
Ari-Matti
Post a reply to this message
|
 |
|  |
|  |
|
 |
|
 |
|  |
|  |
|
 |
Ari-Matti Leppanen wrote:
> ..and a nice jar for drying them.
Very nice! With a bit of color on the jar it can look even better (I know
it's a test). I'm really waiting to see the results of this unofficial
"kitchen" contest. :)
--
Jaime Vives Piqueres
La Persistencia de la Ignorancia
http://www.ignorancia.org
Post a reply to this message
|
 |
|  |
|  |
|
 |
|
 |
|  |
|  |
|
 |
> It's not that hard to make or combine textures and bump maps in
> image editor. And they render faster than procedural textures.
> Some time ago I made a scratched metal bump map. It took 15 minutes
> in Photoshop to make. Try it, it may work :)
> http://www.pp.htv.fi/kkivisal/metal_bm.jpg
Can you explain how you did that, I want to try that in GIMP.
Post a reply to this message
|
 |
|  |
|  |
|
 |
|
 |
|  |
|  |
|
 |
The knife and fork look very nice, but I find the spoon too curved. I
believe it would look better if it kept a curvature similar to the fork.
Post a reply to this message
|
 |
|  |
|  |
|
 |
|
 |
|  |
|  |
|
 |
Artis wrote:
>
> > http://www.pp.htv.fi/kkivisal/metal_bm.jpg
>
> Can you explain how you did that, I want to try that in GIMP.
I had this idea that layering, rotating and scaling multiple
copies of a simple free hand pattern would generate something
useful. This the starting pattern which I kept as reference
because I liked the final result.
http://www.pp.htv.fi/kkivisal/metal_bm_0.gif
Start with white bg. Add layer and draw with black the initial
pattern. Make it sparse because it will get denser in the process.
Make 4 copies of the layer with different opacities and apply
random rotation to each.
Flatten layers. Erase to white the edges of the image with wide
soft edged brush. Needed because it will be used as a brush.
Make 2 scaled (60% and 40%) copies of the image and make 2 new
brushes from them. Multiple brushes with different scalings
and rotations would be better but I needed the map fast to
test another idea :)
Open new white image with a new layer and fill it with random
strokes of the big brush. Add layer with lower opacity and paint
on it with the small brush. Delete random parts of both layers
with some big sparse brush. I used one made from image of rusty
metal plate. Flatten layers.
Duplicate the image as a new image, scale it 50% and make it a
pattern. Add new multiply layer to the previous image and fill
it with the pattern. Rotate the layer 90 degrees and adjust
opacity at will. Flatten and sharpen image.
Use your favourite method to make the image tileable if needed.
My method was: offset 50%,50% and clone over the seams.
That's it. Just rotations, scalings, brushes, layers and opacities.
I may not remember the details right but they are not important.
_____________
Kari Kivisalo
Post a reply to this message
|
 |
|  |
|  |
|
 |
|
 |
|  |
|  |
|
 |
On Wed, 9 Jan 2002 18:52:55 +0200, Ari-Matti Leppanen wrote:
>..and a nice jar for drying them.
>
Something about the scratches/bumps looks very unreal. Full marks
for the container.
--
Cheers
Steve email mailto:ste### [at] zeropps uklinux uklinux net
%HAV-A-NICEDAY Error not enough coffee 0 pps.
web http://www.zeropps.uklinux.net/
or http://start.at/zero-pps
10:41pm up 93 days, 14:29, 1 user, load average: 1.00, 1.06, 1.07 net
%HAV-A-NICEDAY Error not enough coffee 0 pps.
web http://www.zeropps.uklinux.net/
or http://start.at/zero-pps
10:41pm up 93 days, 14:29, 1 user, load average: 1.00, 1.06, 1.07
Post a reply to this message
|
 |
|  |
|  |
|
 |
|
 |
|  |
|  |
|
 |
I believe the utensils too reflective for the number of scratches ou have impied.
Someone posted a blurring algorithm for reflective
finishes, and that would help here, though the render time would certainly increase.
The angle on the spoon implement is too severe I believe.
Overall, nice work!
Grim
Post a reply to this message
|
 |
|  |
|  |
|
 |
|
 |
|  |


![]()