|
 |
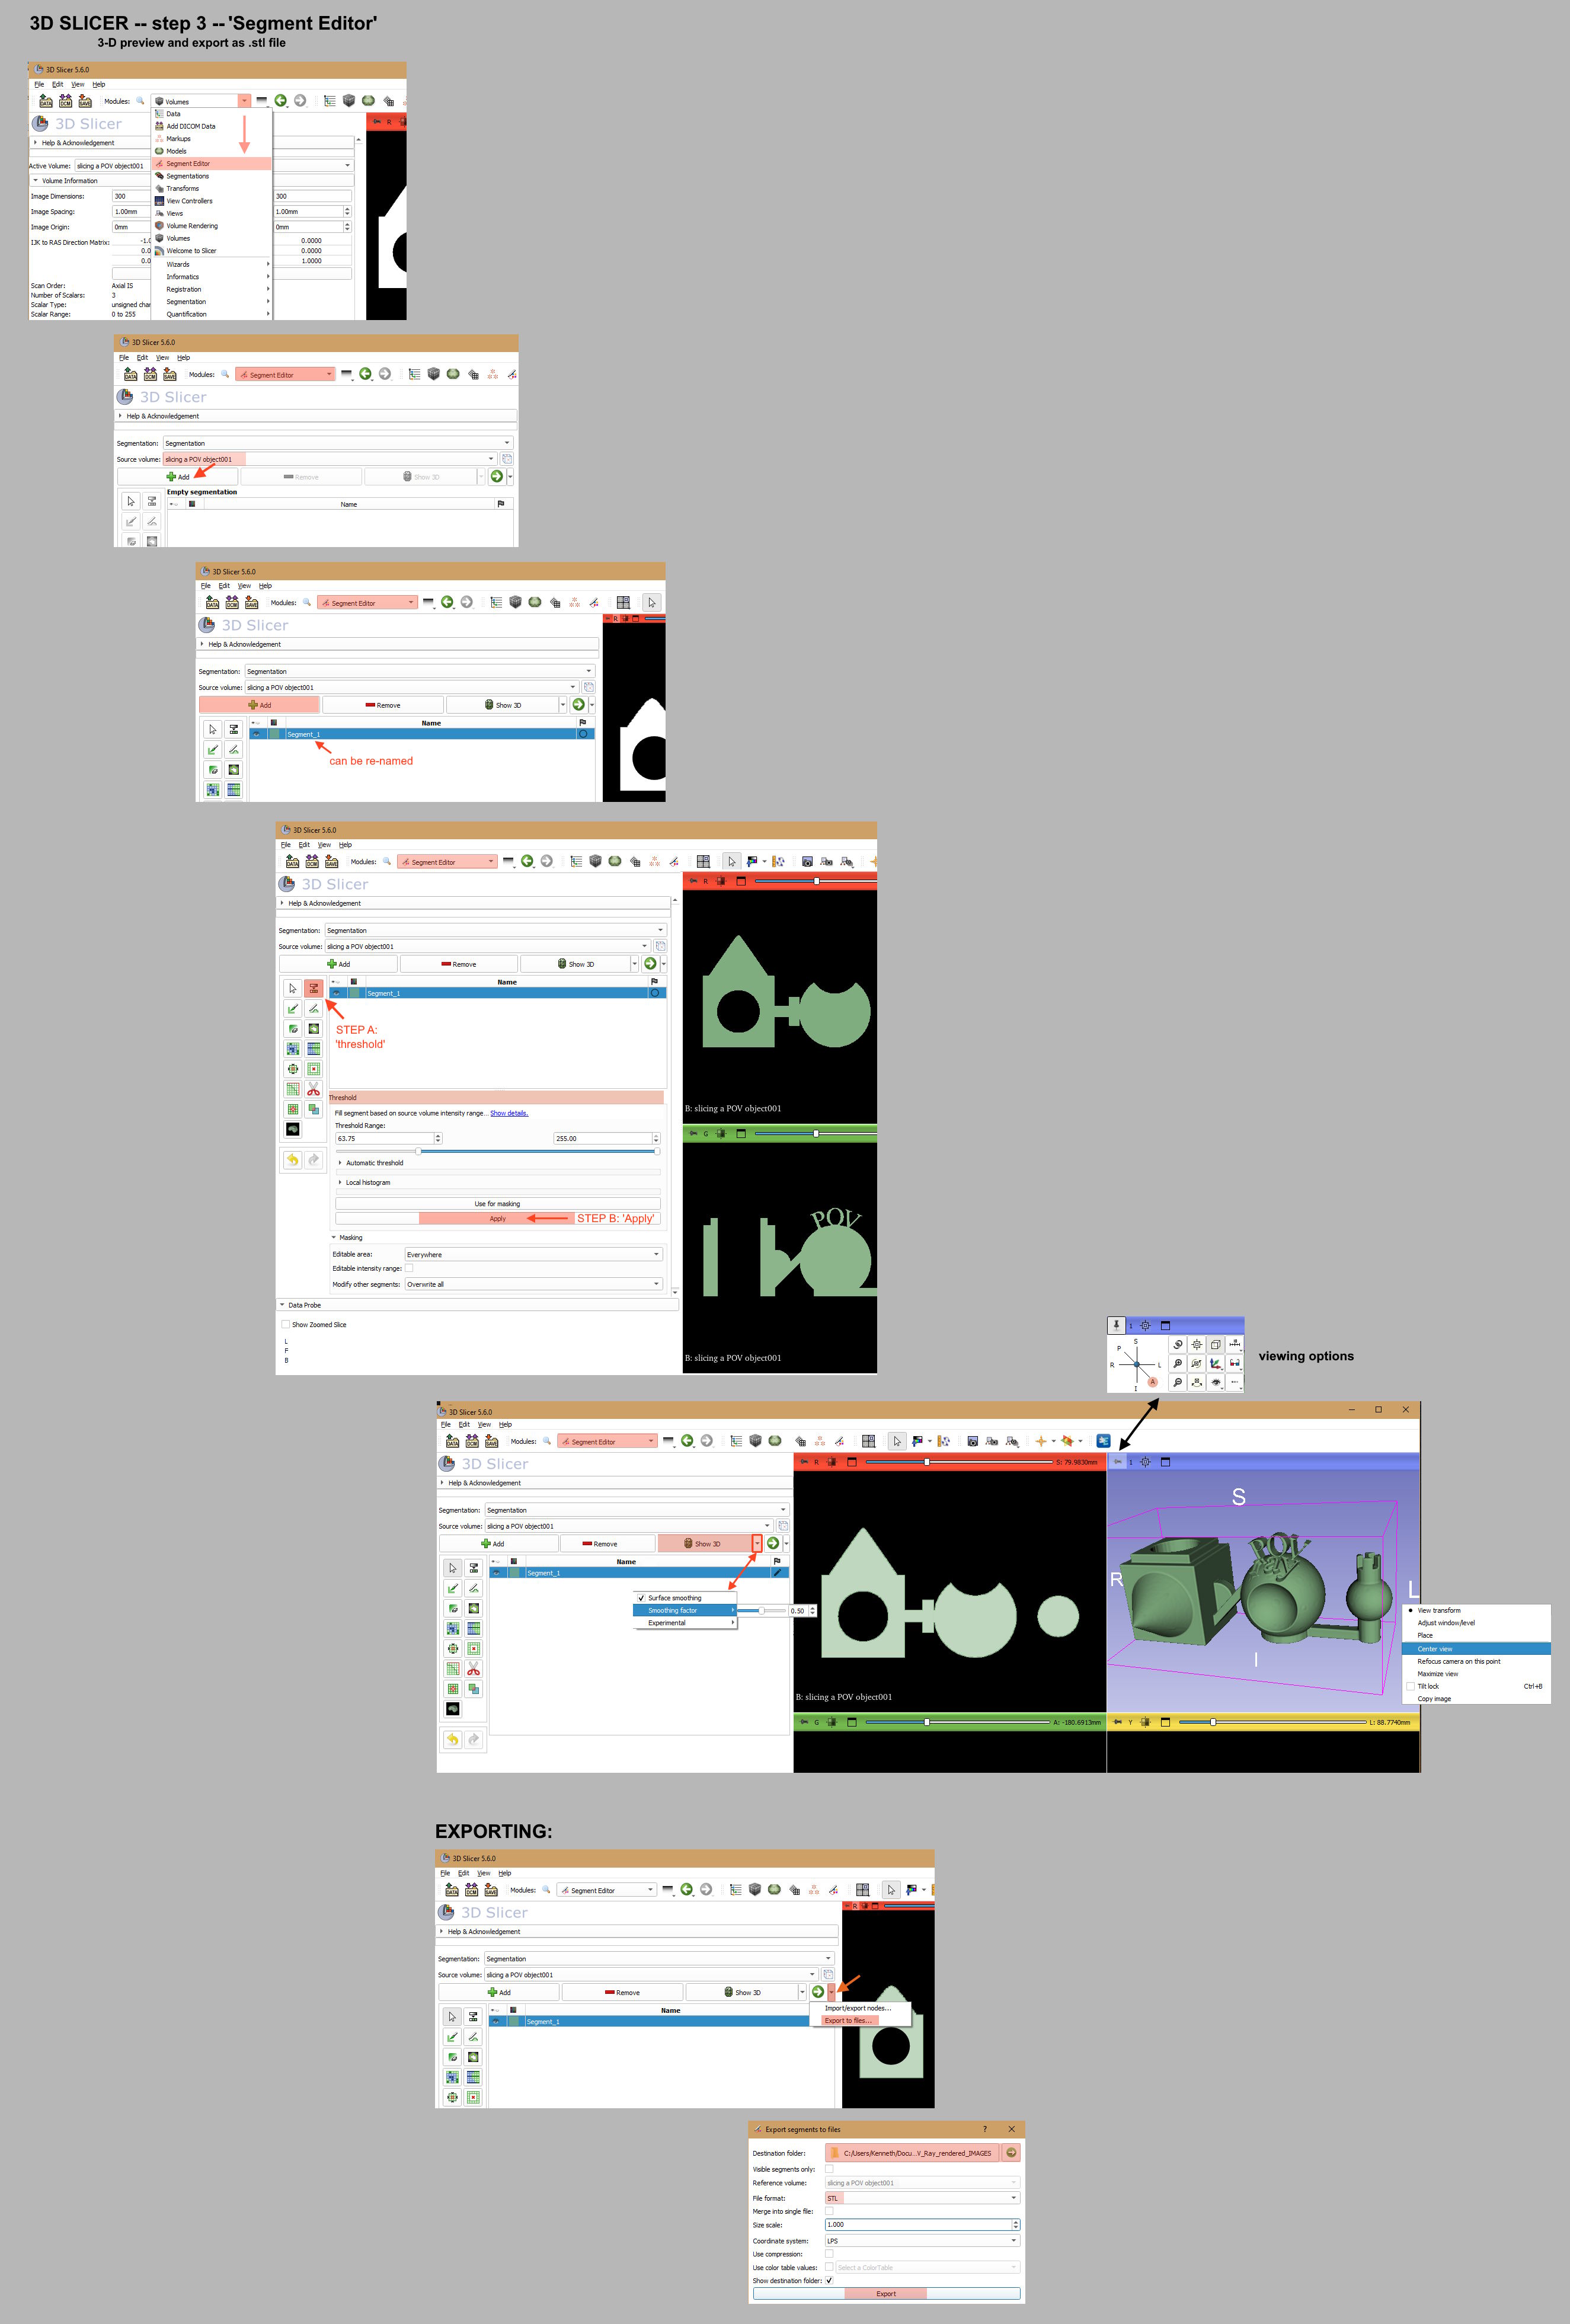
3D SLICER STEP 3-- The 3-D preview, and exporting the .stl printer file.
See the attached image as a guide.
From the original 'Welcome to Slicer' menu at the top, choose 'Segment Editor'
instead. This is where the 3-D preview is generated, and where the recreated
voxel model is exported as an .stl triangle-mesh file for 3-D printing.
A) In the 'Source volume' box, the name of your first chosen slice image will
automatically appear.
B) Press the large '+Add' button. An entry line will appear called 'Segment_1'.
This will eventually be the default name of your exported file, but you can
double-click on it here to re-name it as anything you like.
C) Next to that line on the immediate left is an icon (one of many); this
particular icon looks like two horizontal bars or an = sign. It is called
'threshold', but you will need to hover your mouse over it to bring up the name.
Click on that (or you can use your keyboard's space bar to activate it.)
D) The three orthographic view-panes will start flashing green-- just the
'active' models parts, not the black background. A new data box will also
appear, with a 'threshold' slider, but that does not need adjusting because the
voxel-creation 'threshold' of our white-on-black image slices has been
automatically set. (This slider has an interesting use when CUTAWAY_TEXTURES has
been invoked in the original slicing code-- where the resulting gray-level
pixels can be incorporated as voxels or eliminated. But that will be described
later.)
E) Press the 'Apply' button in the lower data field. This essentially finalizes
the model, and the green flashing stops. (Be careful not to hit the space bar on
your keyboard after this step; it re-activates the 'threshold' icon...the green
blinking. To escape this, hit the space bar again.)
Now comes the 3-D view generation:
F) Press the 'Show 3D' button, and give the app time to generate the model. Once
it appears, right-click on that view-pane to bring up a menu and choose 'Center
view'. Now you can use your mouse to interactively rotate, zoom, etc. (Note
that this somewhat crude 3-D preview is not the higher-quality that will
eventually be printed.) At the top of the 3-D view are some icons; experiment
with those to see some interesting features.
At this point, the model's voxels have been automatically 'smoothed' by a
default amount of '0.5', but that can be changed:
G) To the immediate right of the 'Show 3D' button is a downward-pointing arrow.
Click on it to bring up the little 'smoothing' menu. The 'smoothing factor'
slider there can be adjusted between 0.0 and 1.0, and the 3-D view will update--
quickly or not-so-quickly, depending on the object. You will need to experiment
to choose which value is best for a particular model. My personal preference
when using *hi-rez* original slice images-- i.e. lots of created voxels-- is
between 0.5 and 1.0; even sharp edges are retained. [BTW: This smooths
individual voxels-- and thus the final .stl triangles, but by simply moving
their vertices; no finer-scale tessellated triangles are created.) Ideally,
sharp-edged objects should have zero smoothing, while curved surfaces should
have 0.5 to 1.0. Unfortunately, that's not possible, so a compromise is
required...but high resolution slice images (and more of them) makes this less
of a problem.]
The model is now ready to be exported as an .stl file:
H1) Of the three arrows to the right of the 'Show 3D' button, click on the
right-most arrow. Choose 'Export to files...' there; the export dialogue box
will appear. You will need to choose a suitable folder location for your file,
using the 'Destination folder' box; search by clicking in that box (not with the
green arrow.) Once chosen, 3D SLICER will remember that location in the future.
H2) Choose .stl as the 'File format', then press the 'Export' button.
***** FINISHED! *****
This is a binary file, not a text file. There is no choice of which, but it can
be easily converted in another app like Meshmixer--should you want to. (3D
SLICER can also export an .obj file, if you have a need to edit the model in
another app.)
-------------------
Before hitting the 'Show 3D' button, the initially empty 3-D view shows a 'cubic
volume' in red outlines...probably a default bounding-box. When the 3-D view is
activated, the object appears in the upper right quadrant of that volume-- in
the x/y/z 'positive space' quadrant-- instead of at the center. (Imagine
POV-ray's x/y/z origin planes going through the center of that cubic space.)
Apparently, a medical CT scan will be automatically centered in that cube(?)
because it has both 'positive and negative' values in its data-- probably based
on the central horizontal axis of the particular CT machine. Whereas, the
POV-ray image slices have pixels that are all 'positive values' so to speak, no
'negative pixels'. Thus the model initially shows up in the upper-right 'fully
positive' space. By centering the view in step F) above, the model is
re-centered within the red outlines (and in a more tight-fitting box).
There is a neat trick in this 'Segment Editor', after applying 'Show 3D': Press
and hold cntrl+left mouse button and slide the mouse from right to left in any
of the 3 orthographic views. The 3-D model becomes more or less transparent--
fully solid at the right, fully transparent at the left. You can see all of the
object's internal surfaces, like an x-ray! (This does not affect the final
export.)
Once you have done these 'Seqment Editor' steps, there is a way to determine how
many actual voxels have been created. 3D SLICER has 'extra' features in another
pull-down menu at the top called 'Modules'. Use the magnifying glass icon
there to open it, then search for the 'Segment Statistics' module. Open that,
then open 'Advanced' from the data field, then hit 'Apply'. (Afterward, to
close the statistics box that appeared, go back to the top of the app and choose
the 'Four-Up' view again.)
Post a reply to this message
Attachments:
Download '3d slicer step 3-- 3d preview and exporting-- kw 2024.jpg' (705 KB)
Preview of image '3d slicer step 3-- 3d preview and exporting-- kw 2024.jpg'

|
|